
- Getting Started:
- Dispatch Tab
- Location Type
- Cancels/Refusals
- Signatures
- Procedures and IV Status
- Exceptions
- Common Exceptions:
Call Numbers:
Current Year-Current month-Last 4
Example:18 (Year) – 10 (Month) – XXXX (Last 4 of call#)
- Should you have multiple patients in the unit being transported, you will label each patient with the corresponding letter at the end of the last 4.
Ie. T18-10-1234A; T18-10-1234B; T18-10-1234C
If you are picking up in an outside territory, you will input the operation identifier in front of the call#….
Roswell – R Santa Fe – SF Las Vegas – SM Pecos – P Grants – G Torrance – T Alb – No letter
There is never a dash (-) between the letter and year
INCORRECT: T-18-10-2501 CORRECT: T18-10-2501
- If you use the CAD import for your information (Clicking on the blue satellite icon) it will populate the CAD number not the run number into the run number field. Do not use this option, due to it is not the correct call# format.
- You need to erase that number and use the proper run number in its place
- Operation: You will select the operation territory that the transport is originating in if you are covering for another territory. Ie. SF crew covering SM territory, SF Crew covering Alb Territory
- Unit assignment:
- Please make sure you are selecting the correct unit number when you are doing shift set-up
- Default Vehicle should NOT be used
- Shift set up
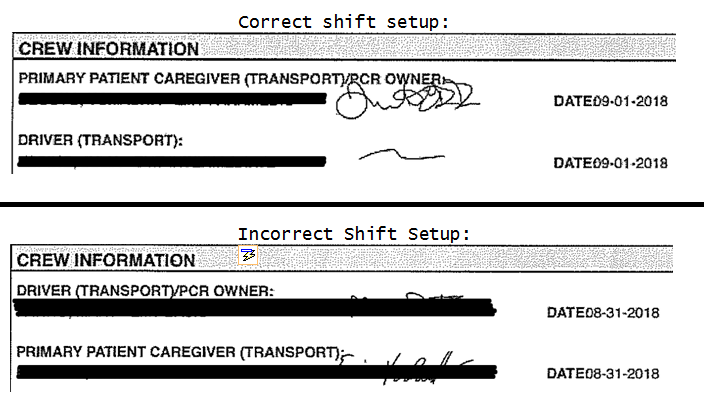
- Assigning personnel :
- Both Crew members must be assigned on the shift set up and both MUST sign
- Assigning personnel :
Please select you correct role when you are the PCR author
You cannot be the PCR author and the driver at the same time; you must be select primary caregiver if you are the PCR author.
- Crew Signature dates:
- You must assure the date of the crew signatures match the date of service.
- If your signature dates do not match the date of service, Billing will kick the report back to you as an exception
- Should you receive your report back from billing for the date of the crew member signature not matching to the date of service, you will need to open the shift setup on the ipad.
- Once you open the shift setup, it will automatically update the dates to match the date of service. There is no need for you to change anything additional
Dispatch Tab:
Pick Up Location type:
- You must select an item for the pick list when you select the location type
- When you make a selection in this field it opens a secondary dialogue box
- In the pick-up location type box you must make a selection from the “list” of facilities. Which includes Residence and/or Scene
- If you are responding to a residence
- You must select RESIDENCE from the pick list
- If you are responding to any other location other than a residence, intersection, business etc, select SCENE from the pick list
- Please assure that on the pick-up location screen, “name” field populates correctly, according to what you are entering
- If you are responding to a residence
- Do not put the name of a business as the location name, it will not import into the billing program with anything other than what is on the pick list
- In the pick-up location type box you must make a selection from the “list” of facilities. Which includes Residence and/or Scene
Adding an Address:
- When you are manually inputting an address, once you have the street address inputted go to the zip code; input the zip; from there the city, state and county will auto-populate into the fields
- If the facility does not exist in the system for you to select: Please improvise by selecting Facility Other, and inputting the exact address you are responding too
Location Type: You must use Scene, Residence, or an actual Facility that is in the pick list.
- If you do not choose one of the 3, your report will not import into billing and the report will be kicked back to you as an exception from Billing.
- Residence: Someone’s Home; whether it is the patient’s home or someone else’s, if the location is a residence you must select residence
- Scene: If you are responding to anywhere other than a physical home, and it is not a facility, you will select Scene. Ie. Highway, intersection, gas station, etc.
- Facility: any type of hospital, clinic, nursing home, etc. Please verify through the pick list if it is loaded in the system and select the appropriate facility. Once you select the facility, if the address that populates, does not correlate to the address you are responding to, then you have selected the incorrect facility. If you select the incorrect facility, the report will be kicked back to you by billing to be corrected.
If the facility does not exist in the system for you to select: you must use one of the following options:
- If you respond to a Doctor’s Office Urgent Care, Dental Office and it is not listed in the pick list then you must select “Physicians Office” then enter the correct address into the appropriate fields.
- If you respond to a facility (Hospital, Nursing Home, Rehab etc.) and it does not exist in the pick list then select “FACILITY OTHER” and follow the same steps as above.
Cancelled Calls: (Enroute or On Scene) / Unknown Patient name
- Be sure to select the appropriate patient disposition – Refer to Disposition chart
- No pt. demographic information is required
- EXCEPTION: cancelled on scene of a scheduled transfer, and patient info was provided by dispatch, you will enter in the patient info
Cancelled calls with pt. contact:
- You must fill out all required patient demographics information completely
- If you are unable to obtain patient information:
- You need to fill out the patient demographics in the following format.
- For these types of calls use the following information format.
- First: Unknown
- Last: Patient
- DOB: 01-01-1901
- Gender: unknown (select what is applicable)
- Calls where you have a patient and do not have any name, DOB, address, etc
- Then the patient will be John or Jane Doe
- Select the correct Gender of the patient
- Then in the narrative of the call give an approximation of the patient’s age
- If you are unable to obtain patient information:
ANY CALL YOU DO NOT TRANSPORT A PATIENT:
- YOU MUST CHANGE THE NUMBER OF PATIENTS TRANSPORTED TO ZERO (0)
- If the report does not allow you to choose/input 0, then you need to check the disposition that you have chosen. Is it correct? If you have chosen the correct disposition, it should allow you enter “0”
REFUSALS: see the attached algorithm sheet
- You MUST complete the refusal form from top to bottom with all applicable information
- Top of form must be completed in full including call#/Primary provider/etc
- All applicable boxes must be checked at the top of the form
- Bottom portion of the form MUST be completed in full with patient’s name/demographics/etc
- All Signatures must have printed first and last name of the signer IF it is not the patient signing
- All refusal signatures must be dated with date of service
Patient signatures:
- ALL patient signatures must be obtained on the attachment signature form.
- These forms are found under the paperclip icon in the toolbar, there is a Spanish and English version found there.
- Form MUST have the patient’s First and Last printed Name and MUST have the correct date of service
- PLEASE NOTE: If you open up the signature form attachment on the ipad prior to loading the patients information, the form will NOT auto-populate the patients first and last name
- Should the signature form be received by billing without the printed first and last name, the report will be returned to you.
- Should you have the report returned to you for no printed first and last name on the signature form, all that is needed is to open the signed signature form attachment. The page will auto-populate/update with the patients first and last printed name. Nothing additional needs to be done.
- You must date the signature of the person who is signing. Click the area next to the signature that says “date”, and select the correct date of service.
- You must complete the reason the patient could not sign in the appropriate area of Section II or Section III of the form.
- If you using section II, be sure to check the appropriate box indicating the relationship of the signer to the patient
- Billing will kick the report back to you should the signature form not be completed or if the form is not completed correctly.
- DO NOT USE THE PATIENT AUTHORIZATION AREA IN THE iPCR PROGRAM: YOU MUST USE OUR STANDARD SIGNATURE FORM FOUND AS DECSRIBED ABOVE ….
- You should not have any need to complete any paper signature forms
Transfer of care signature:
- You MUST Utilize the transfer of Care form in the iPCR program for all calls
- TRANSFER OF CARE SIGNATURE DOES NOT REPLACE USING THE SIGNATURE FORM
- TRANSFER OF CARE IS A STATE REQUIREMENT;
- SIGNATURE FORM IS A MEDICARE BILLING REQUIREMENT. YOU CANNOT COMBINE THE 2.
- Complete all the fields in the pop-up screen
- Should you not obtain a transfer of care signature, if applicable, the report is now incomplete.
- You must input the first and last name of the signer, with credentials when applicable, for the transfer of care signature. If you do not, billing will kick the report back to you to be corrected.
- TRANSFER OF CARE SIGNATURE DOES NOT REPLACE USING THE SIGNATURE FORM
Procedures and IV status
- Just as in ePCR if you record that you preformed a procedure in your narrative in must be recorded treatment tab.
- IV status ( in the treatment tab there are specific fields for IV status listed below)
- Venous Access
- Access an existing Catheter (Anytime you utilize a PICC line or other central line to administer medication or fluids)
- Blood Draw only in RW
- Discontinue IV: anytime you DC an IV in the field
- IO Peripheral/extremity: IO start or attempt
- IV Peripheral/Extremity: IV start or attempt
- Venous Access Extremity: Existing IV not started by you that is running
- Venous Access Extremity-INACTIVE: This is a saline or hep. Lock
- Please use this status to assure we are accurately documenting IVs
- Venous Access
Exceptions:
As billing reviews charts there will times when you will be requested to make revisions to you charts. This process is more automated with iPCR.
- Submitted charts will be reviewed for accuracy and other components required in order to submit claim.
- PLEASE NOTE: Be sure and review the entire correction note from billing. You may have more than 1 exception/error that needs to be corrected. Billing will send all corrections needed in the same email.
- Should you only correct some of the errors, and submit the report back to billing, once received billing will send the report back to you to correct the remaining errors.
- ALL ERRORS NEED TO BE CORRECTED AT THE SAME TIME
- If an item needs to be corrected billing will send the PCR back to the iPad, along with an email notifying you of the report being sent back. Your manager and Pete Anderson will be CC’d on all reports
- When you log on to iPCR there is a message center and it will notify you that you have a message that needs your attention.
- You will need to open these messages and correct the issue with the chart that has been sent back to you.
- You will be able to make corrections on the iPad and re-submit the chart to billing. (no longer needing to log on to a LAN client)
- Once you have made the requested corrections then you will re-submit the chart.
- The expectation for getting charts corrected:
- Crew members will have 3 days to correct errors on report. Should the report not be returned to billing within this time frame, the report will be RECALLED by billing and sent directly to your manager for the corrections.
- Should this happen before you are able to review the email/corrections sent by billing, you will need to DELETE the email from your inbox
- Managers will be required to check on the status of returned charts daily to assure the corrections are being completed in the allotted time frame
- Should you have questions on corrections of errors, you have the ability to communicate with your manager or Pete, through the email option on the IPAD. If you are unable to get in touch with your manager or Pete Anderson, please utilize the email option and contact billing.
- Crew members will have 3 days to correct errors on report. Should the report not be returned to billing within this time frame, the report will be RECALLED by billing and sent directly to your manager for the corrections.
Do not skip the correction that is being asked of you to correct if you do not understand. You will need to contact someone for additional help.
MOST COMMON EXCEPTION ERRORS BEING MADE BY CREWS:
- Incorrect Call#’s:
- Every call# should begin with the current year/current month/followed by last 4 digits of call# given by dispatch.
- Example:18 Year – 10 Month – XXXX Last 4 of call#
- Should you have multiple patients in the unit being transported, you will label each patient with the corresponding letter at the end of the last 4. Ie. T18-10-1234A; T18-10-1234B; T18-10-1234C
- If you are picking up in an outside territory, you will input the operation identifier in front of the call# (current year digits):
- Roswell – R Santa Fe – SF Las Vegas – SM Pecos – P
- Grants – G Torrance – T Alb – No letter
- There is never a dash (-) between the letter and year:
- INCORRECT: T-18-10-2501 CORRECT: T18-10-2501
- Gender – The report will default to MALE, you must update to FEMALE when applicable
- Wrong date of service – If you are transporting “through midnight”, your date of service is the date you were dispatched to the transfer
- Incorrect pick up and/or Drop off (destination)location type for both scheduled transfers and 911 responses
- You MUST select your location type from the pick list or else your report will be returned
- Mileage – Your “destination” and “Total” MUST be matching in order to import into billing
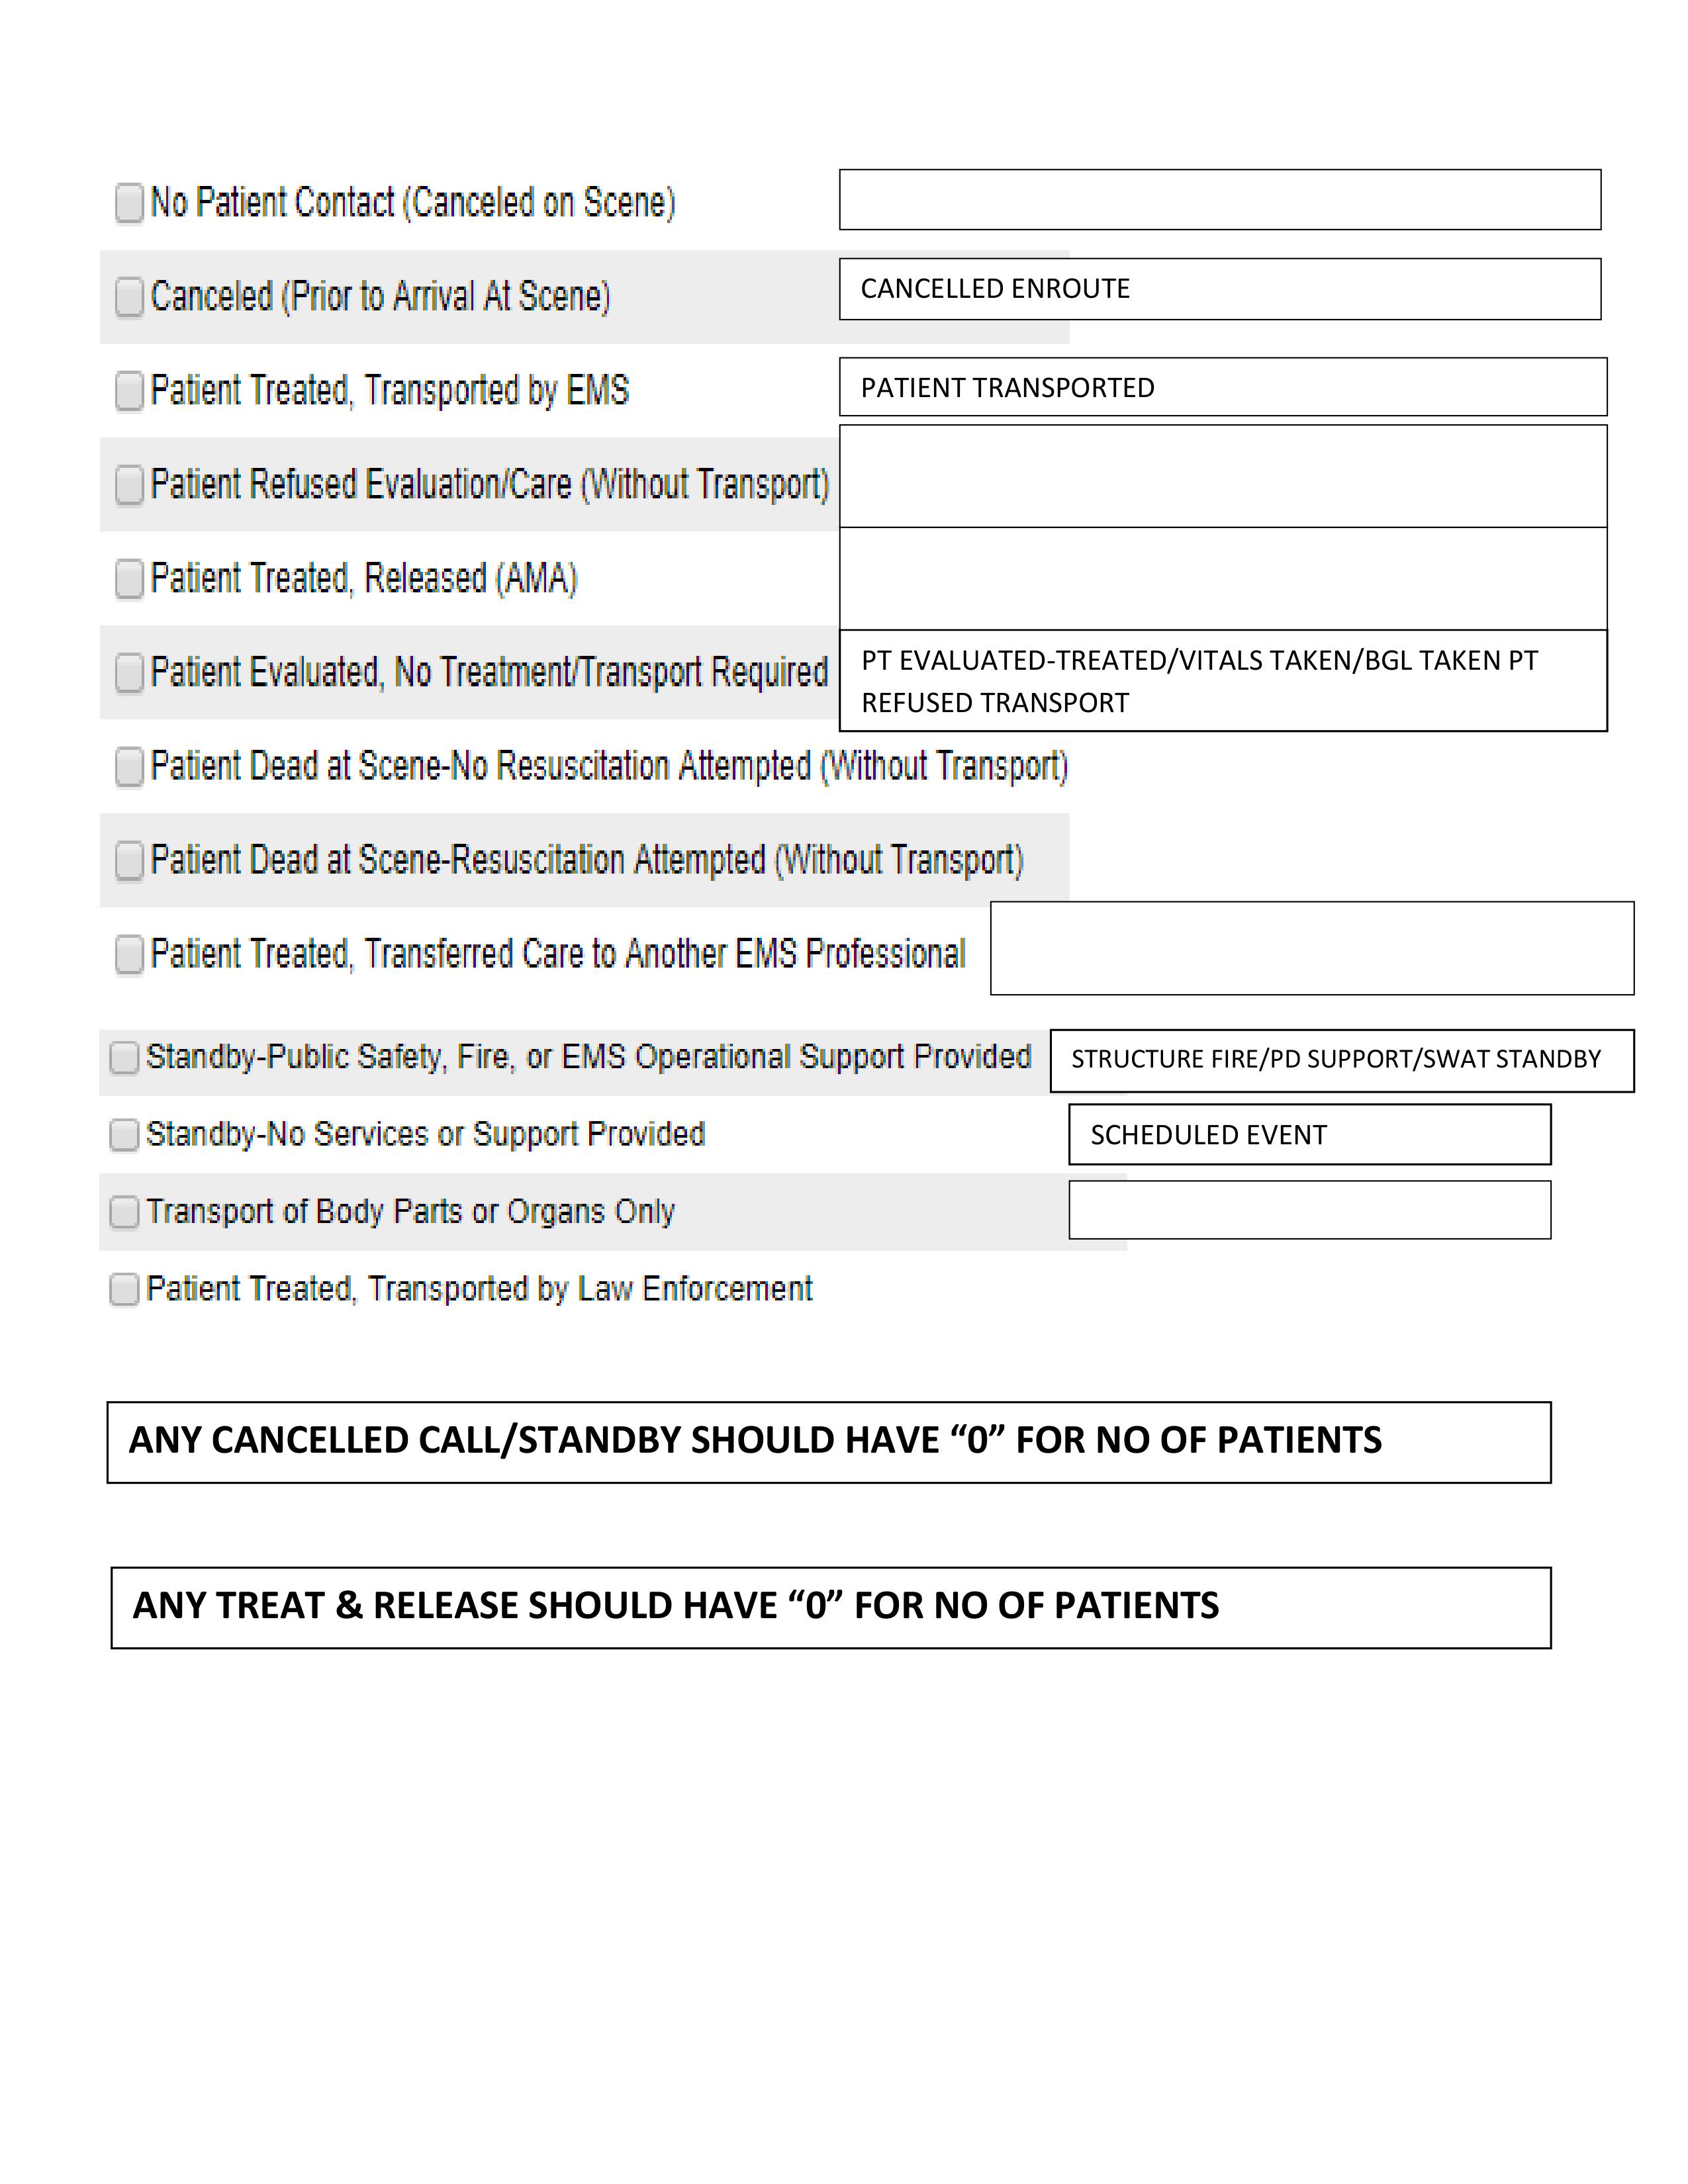
- Incorrect Drop off Disposition Chosen – Please select the applicable disposition according to the following:
- No Patient Contact (Canceled on Scene) – CX on Scene with no patient contact
- Canceled (prior to arrival at Scene) – CX Enroute with no patient contact
- Patient Treated, Transported by EMS – Regular Transport
- Patient Treated, Transferred Care to another EMS professional – Used when transporting to airport with flight team/Intercept with ourselves or other entity.ie. fire and rescue
- Patient Evaluation, No treatment/Transport Required – T&R, pt evaluated/Vitals Taken, etc
- Patient refused Evaluation/Care (without transport) – T&R, Non-Patient/no injury/no vitals/ no assessment done
- Patient Treated, Released (AMA) – T&R, pt treated or assessed and is refusing transport but has at least 1 or more potential serious illness or injury present
- Standby By-Public Safety, Fire, or EMS support provided – Structure Fire/PD or SWAT standby
- Stand by – No Services or Support Provided – Scheduled Event; Football, boxing, parade
- Patient DOA-Resuscitation attempted (without transport)
- Patient DOA-No resuscitation attempted (without transport)
- Incorrect No of patients transported – Should always show as “0” for standby’s, cancel’s, T&R’s, & DOA’s
- No printed name for Transfer of Care signature and/or Incorrect date of signature
- Crew Member Signature Date-Must match Date of service; for corrections, once received from billing, open up the shift setup section on ipad, the dates will automatically update to match date of service
- Every call# should begin with the current year/current month/followed by last 4 digits of call# given by dispatch.
- Patient Demographics – input the correct information that pertains to the patient
- DO NOT INPUT THE HOSPITALS ADDRESS FOR THE PATIENTS HOME ADDRESS
- Billing will kick the report back to you to have the hospitals address removed
- please use face sheet received from the hospital when you are picking up or dropping off the patient to obtain their correct demographic information
- Ask the patient for their information, when applicable
- Signature Form – All Forms must be complete with all pertinent information for all transports
- Section I of the signature form.
- You must have a date next to the patients signature
- You must have a date next to parent/legal guardian signature
- You must have printed first and last name of parent/legal guardian
- Section II of the signature form. You must have all areas completed:
- Reason patient could not sign for themselves
- Must check one box that applies to the relationship of the signer
- Printed first and last name of signer
- Date next to signature of signer
- Add credentials of signer, (if applicable)
- Section III of the signature form. You must have all areas completed:
- Reason patient could not sign for themselves
- Facility location and time
- Crew member signature, date of signature, printed first and last name, credentials
- Printed first and last name of facility signer, with date of signature
- Add credentials of signer, (if applicable)
- Refusal Form – Form must be completed from top to bottom; please input all applicable information
- Section I of the signature form.
- DO NOT INPUT THE HOSPITALS ADDRESS FOR THE PATIENTS HOME ADDRESS
Crews need to correct ALL errors/exceptions when received from billing.